Sunday, December 2, 2012

LED Multi-Use Lighting for the Owners Stateroom

We have been considering putting accent lighting in the Owners Stateroom since we completed the refit there last year.  I ended up purchasing some LED light strips that were single color and waterproof at a local electronic component store to install in the boats breaker box.  I never did install them but it started the expansion of our ideas for the stateroom.

LED lighting is available at West Marine but it is very expensive and not as versatile as what you can order online.  I reviewed the specs for the LED strips from West, and the ones I can find on Amazon seemed to be fairly similar in that they were the bright LED style strips and waterproof, but the ones from Amazon were also able to be cut to any length and could be set to change colors if desired.

Link to Amazon RGB LED Lights

Thin Cedar Strips mounted
We chose Cedar as the mounting surface for the pleasant smell, resistance to moisture and lastly it was an inexpensive but good way to accomplish the task.  I bought a single 8 foot cedar fence picket and 3 8 foot lengths of scalloped moulding to put the LED's behind.  We got these from home depot.

We cut thin strips of the cedar wood and drilled thin pilot holes through it every 18 inches or so.  We then drilled a small countersink hole at each one so that when mounted to the walls, the screws would be flush.

These particular LED lights came with a 120V AC to 12V DC adapter included in the kit which allowed me to toss that and wire these directly into the boat's 12v DC system.  When we did the refit in the stateroom, we planned to add lights later so already had wiring into each of the 4 corners of the room.
LED's mounted to cedar strips

When installing these lights, we installed the small electronic component, and Infra Red Remote receiver into the corner of the stateroom (where later we will install a small shelving unit with power in it to charge cell phones and Ipad's and store eyeglasses when sleeping).

Once the wiring was connected to the connector for the LED's we mounted the LED strips to the cedar strips facing down.  These particular LED's come with a 3M adhesive backing but I don't suspect that will hold up in the varied temperatures on the boat.  We are adding some epoxy glue to the back side as well to ensure they stay put.

The scalloped molding was also cut to the proper length, had pilot holes drilled, as well as counter sinks allowing us to install and fill the screw holes with bungs after the fact.    Every time in the past we had installed anything that was wood on the boat, we have used a good hardwood (either Teak or Mahogany) but in this case we chose to use a simple pine molding and stain it to the color we wanted.
All my wiring tools
(meter, shrink wrap, marine crimps), etc

After staining the pieces, we applied multiple coats of varnish like the rest of our interior projects.  Once dry we installed these pieces of molding to the cedar strips with the top of the molding flush with the top of the cedar strip so that it creates a void aiming downward for the lights to shine down without being able to see them directly.

We are happy with the way the LED's have turned out and will also be doing something similar in the Salon as we wrap up that part of the refit as well.   The good news is that the entire strip of LED's in the stateroom (about 16 feet of them) still draws minimal amps and are better than the 2 double filament fixtures that were back there before we started the refit.  It is a pleasant surprise to turn on all of the boats LED lighting throughout and watching the DC Ammeter barely move.

Below is a short video we did showing what the lights look like in operation.  We filmed them with the lights changing colors but I don't see us using it that way, I suspect that we will just have a single color when they are on.


Saturday, December 1, 2012

Rigging upgrades

As Deb and I got mid way through our Salon refit we noticed that the chain plates were leaking.  The research we did speaking to other Gulfstar owners as well as others that had boats of this vintage was that the chain plates likely need to be replaced.  If we were going to be trying to repair the leaks by rebedding them, we may as well have them replaced when we do.
I was a bit suprised at the cost for Chain plates to be made, but it is not like you can just call up your local store and order them, so you end up having a fabricator make you new ones using the old ones as patterns.

With all the travel I have been doing, Deb stayed here and worked with the Rigger to have these replaced.    He started by removing the port side lower shrouds and unbolting the chainplates from the hull.  Over time they had been sealed, caulked and who knows what else had been done in the last 30 years to try to keep water from running down the stainless steel chain plates and into the boat.  To get them out, he would connect the halyard to them and then use the winch to apply some upward pressure.  Here you can see the port side coming out.  Remember they go through the toe rail (about 3 and half inches of wood), then through the hull to deck joint which is a layer of the hull sides that is folded over and also a flange on the deck of similar thickness.  On our Gulfstar the hull is solid fiberglass lay-up and when we measured where the bolts went through it was 15/16" thick.  Just a tad shy of an inch.  

As of this posting, there are 3 of the 6 replaced, Monday he is coming back to install the 4th and removing the final 2 that are holding the upper mast supports.  He will take them to the fabricator and I expect we will have them back Tuesday or Wednesday.

As he has been removing them, Deb has been epoxying any small hairline cracks in the toe rail.  In one case the toe rail was split about 1-2 inches on both the fore and aft side of the chain plate opening.  I was so impressed with her first epoxy job.  She mixed it up, injected it down into the crack with a syringe and then clamped the toe rail tight.

After a good rain, we noticed that they were still leaking a bit (horrible disappointment after spending all of that money).  When we asked the rigger about it, he suggested we try pouring water on the deck to see if they are leaking from where the chain plate comes up through the toe rail or if water is seeping under the toe rail and then finding an exit in the chainplate hole.  Well based on our test we think it was the later and had nothing to do with the quality of work by the rigger.

So back to the boat today with heat gun in hand.  We cleaned all of the silicone that was there from a previous attempt to stop the leak, and ensured it was all gone.  We then mixed epoxy in a small syringe and injected it in the tiny crack between the toe rail and deck.  It was kind of like calking with a tip the size of a needle.  It seemed like it was working very well as it was being laid down and even seeped a little more generously into the areas that had a noticeably bigger gap.

Our Mast Head
(Anemometer, anchor light, vhf antenna and windex)
Since the rigger was going to be here, we opted to take care of several other things that were on our list to get done.  So the list is.

  • Rear Backstay replaced (had a small crimp in 1 of the 19 strands of stainless steel)
  • New VHF antenna mounted on mast head (not sure what happened to the old one, I noticed a couple of months ago that just the base was there, the antenna itself was gone)
  • New Deck light bulb installed (heck if he was going to be up there, lets get it all done)
  • Had him add an additional block at the top of the mast for a 3rd halyard (it will be nice to have a backup halyard in the event of a failure, rigging issues or even a backup line for a bosuns chair.)
  • Deb was cool and surprised me with new Halyards for the Main and Jib while he was here.  The old ones were losing their "flexibility"
  • 2 new flag halyards on each spreader for proper quarantine flag flyings, burgees, etc.
  • Lastly a complete rigging inspection (all looked good)
New Main Halyard (New England Spectra Line)

It has certainly been a productive week and will be a productive next month or so.  We will be going back in with all of the salon rebuild as soon as the chainplates are back in and the hatch is installed.  (We have to know all the leaks are taken care of before we put the wooden walls back in place).  We have also got smart about ensuring that we are building access panels to all of these as well through cabinets, walls, etc.

In the last week we have also been getting everything lined up to finalize the salon and galley refit.    We have placed our order for a new 16K BTU reverse cycle air conditioner and heater for the salon.  This in addition to the 12K BTU unit for the rear stateroom should be more than enough for our warm days when living aboard.  The great news is that as long as we don't sail in sub 40 degree water, we can use the same units to heat the boat.   It was out of stock so hoping we have it in the next few weeks.

She looks small from 50 feet up
(You can see our welcome aboard matt on the dock)
The hatch that was leaking was sent back to the manufacturer (nice to see they are still family owned and in business) and being rebuilt and having new glass installed.  Our Gulfstar has all heavy duty Atkins & Hoyle opening/reversing hatches and I spoke to Brian Atkins about doing the work.  It is currently curing and will be coming back next week.

We are also really excited about our new refrigerator/freezer unit.  When we were at a boat show last year we looked at, and really liked, the Cool Blue 12v low draw units with large holding plates.  It was pricy and our unit worked so we just made a mental note and loved the idea of only drawing 24 amps of power in a day.  When I dripped water into our cold machine circuit board, she decided not to run again.  Instead of fixing it (which would have been about 20% of the cost of new unit) we decided to just go ahead and get the best unit for living aboard.    When installed it will give us a complete freezer compartment and a separate refrigerator.  It comes with a 13" X 21" holding plate that is 2 1/2" thick.  The holding plate allows the unit to cool the fluid in that stainless still plate and hold that cold temperature much longer reducing the number of times the compressor has to cycle on and off.  We will end up modifying the opening to our top opening unit to allow better access to the side that we will make the freezer but more on that project when we install it.

Below are a few pictures from atop the mast.  I just through the view was cool so figured I would post them here on the blog as well.
Atop the mast facing North
Watergate Marina starts at the boat house
Atop the mast facing South
Legend Point Marina/Condos in view

Sunday, September 23, 2012

NOT what you want to find in the middle of the job

The work on the Salon continues and we have removed the rest of all cabinetry.  2 opening ports have been removed as has one of the hatches in the roof that was leaking.

Removing the hatch took several hours to break the aluminum frame from the rise as well as breaking the riser loose from the actual deck.  Both had to be removed to inspect the core where the leak was.  We do have softened core in a small section along the opening, it is being removed and filled with a thickened epoxy.

The deck around the openings have all been cleaned and all silicone and adhesive removed.  Acetone worked well along with some 3M pads and razor blades for removing the material.

Image loading, if you are on a slow connection, please wait a momentAll of that was going according to plan, what was not going according to plan was noticing down below that water was slowly coming in along the forward port chainplate.  (The Chainplates are what attach to the hull and then the Standing Rigging, the wire that holds up the mast, is attached to).

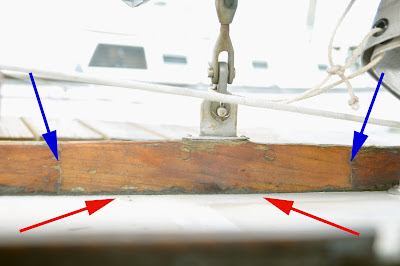
After further inspection, I can see that at some point in time, this chain plate had some type of service done to it.  The wooden toe rail that the chainplate goes through, has been cut and then patched back in.  (Below in the image, the blue arrows point to the spot where the toe rail had been cut to gain access to the chainplate.  The red arrows point to the spot that the water is getting into.  I noticed when pouring just a couple of ounces of water on the deck in front of that patched part of the toe rail, some of it is running in.)   I could likely just run a bead of silicone along the joint between the toe rail and the deck, but I suspect that if this has been leaking for a while, I really want to see what is going on in there where that patch is.  This is one of the benefits of having the boat down to bear hull.  I would have never seen this otherwise and in the end, it is not a lot of water coming in, but a little bit every day would cause serious damage.  Now I know why I am having to replace the wooden countertop in the Salon, I suspected a leaking port, but I don't think that is the bigger problem here.
Image loading, if you are on a slow connection, please wait a moment
The strange thing is that it was not raining, this leak became evident just from the dew that was on the deck and starting to pool along the edge of the patched part of the toe rail.  Needless to say, I will be removing the patch and inspecting this closer.  This is a delay I certainly did not anticipate.

I am starting to see why I have heard that when starting a boat project, estimate the time line and the cost accurately and realistically, then double the cost and triple the time and you will be about right for the job.  That has certainly proven to be the case in most of our ventures so far.  :)  Ahhh boat ownership.    I joke, but really wouldn't trade it for the world.


Wednesday, September 12, 2012

The Salon Remodel begins

This is an old post from September of 2012, I just noticed that it remained in draft mode and was not published according to it's schedule

Now that we have wrapped up the Navigation Station, Galley and Walkthrough, we had friends in town and did some nice sailing, now it is back to the next bit of work on the boat.

So yesterday it started, cushions removed, everything removed from the storage below the settee, cupboards emptied and the demolition begins.


Connection sped may be slowing down the process of displaying this image.
Salon - Port Side - Before
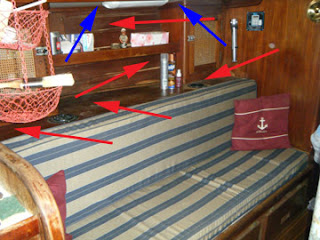
In the "Before" picture you can see both Red and Blue arrows.  The blue arrows point to places where we have noticed water coming in when it rains hard.  The odd thing about a boat is where you see it dripping from is typically nowhere near where it is actually leaking.  In this case most of the dripping was coming out of the florescent light fixture mounted on the ceiling behind the settee.  
The leak actually appears to be coming from 2 places.  One is from a poorly bedded opening hatch about 6 feet from that location.  The other culprit appears to be the opening port just above the light itself.  

The red arrows point to all of the areas where the wood will need to be replaced.  This falls into 2 categories.  The peeling veneer on the back wall is rather easy, typically it is just a thin 1/8" thick piece of veneered plywood as a decorative piece.  The flat top of that counter behind the cushion is a little bit more complex and is 3/4 inch teak veneered plywood and helps to provide structure and strength to the boat by locking the galley and Vbert bulkheads together.  

That is the countertop that the cupboards are mounted to, it is also the top of the storage area behind the seat back and houses the air conditioning vents for the Salon area.  

Salon - Port Side - Wood removed
We removed the cupboards, removed the decorative veneer wall from behind it.  Removed the face of the storage area (Also the back of the salon seats) and then removed the horizontal piece that was rotting. 

As we typically do, we have taken these wooden pieces to our storage unit where we will sand the moulding and all of the good pieces of wood down to fresh wood with 220 grit sandpaper.  For the pieces that are rotted, we will use the old ones as patterns and make new ones.  

The big decision now is if we will put it back the way it was, or try to improve upon the storage that the boat has, and we will likely need when living aboard.  I think we will be doing the later and likely will make new cabinets that are deeper than the previous ones.  We will also work to create dividers and doors across the entire countertop so that we have storage all the way across.  By doing these 2 things, we should more than triple the amount of storage that was above the counter on the Port side of the boat.

The hole in the bottom of the seat is the access panel to the 16,500 BTU air conditioning unit that will be installed as soon as the leaking ports have been repaired.  

The realization hit both of us today, it is amazing that in just 2 day of working  (about 7 hours total) we have gutted this section of the boat again down to bare hull and fibreglass in areas.   It will take us 3 months to build all the new stuff and install it again.  And as we all know Murphy's law (I am convinced he was a sailor) kicked in and it started to rain today and will for the next 3 days when I really need to remove and rebed 2 opening ports and 2 opening hatches in the roof.

We did a small video showing what it looks like in more detail now that we have removed the old "stuff"


Monday, September 3, 2012

Sailing Galveston Bay in a Thunder Storm

This Labor Day weekend some of our friends came down to visit and we decided to celebrate the progress made on our refit work down below with a nice sail out on Galveston Bay.  We picked up some sandwiches from Subway and packed some drinks.  (The boat still doesn't have our galley stocked from all the work we were doing just before this trip)

We left the dock in Clear Lake TX and headed east out into Galveston Bay.  The wind was 12-18 knots or so and we had a really nice sail under full main and reefed head sail.  We were nicely making 5-7 knots or so and the sun was shining and it was great visiting and hanging with friends.  As we reached about 4 miles out into Galveston Bay and approached the Houston Shipping Channel, we could see the storm building pretty good to the west behind us.

Checking the radar showed that the storm approaching wasn't that bad, but there was another building that had stronger cells and lightning so we decided to turn back and head back toward it and toward our home port.

As we approached the start of the Channel Markers near Kemah, I saw a power boat trucking out toward the bay at a pretty good clip.  Deciding that I would prefer to ride it out just outside the channel where it was still deep enough was a pretty easy decision.  We just circled a quarter mile area or so watching for other boats that may be doing the same thing.  I did see another sail boat also hunkered down doing the same thing not too far away.

As the rain let up, and visibility started to improve we were able to easily see the channel and head on back.

In the end, we had a great sail.  Everyone got wet, but we were able to confirm that nobody melted.  The return to the slip and subsequent backing into our slip was near perfection if I do say so myself.

The best part of all of this is that one of our friends was taking video's on her iPhone to send to her daughter.  I used those clips to put together this quick summary of the day.


Now, for Deb and I, it is going to be back to tearing up the Salon as that is the next portion of the boat to be refit.

Sunday, August 12, 2012

New Air Conditioner Circulation Pump

While we have been doing all this sanding and wood work on the boat, we made a conscious decision not to run the Marine Air unit so that we would not get a lot of dust into the system.  We removed the Thermostat from the wall and turned off the breaker.  Now that the wood working is complete and varnish and finish work is going on in this section, we decided to kick it back on and made working down there a little more tolerable in Texas in the Summer.  So as Boat work goes, connected the thermostat, turned on the breaker and no go, no water circulation.

After doing some checking it turns out the Rear A/C Circulation Pump was not starting up.  I think that I have a bad spot on the motor, since I was able to disassemble the unit, rotate the motor a bit and it would start right up.  I decided to replace it with a new one and we can get the other one rebuilt and keep it as a backup.  I replaced it with a March Pump and she is pumping water really good.  Likely went a bit overkill with 1000 gallons per hour but I figured by getting one this large, I could use this single pump to pump water through both air conditioner units in a pinch.


Thursday, June 28, 2012

Using Git-Rot Penetrating Epoxy on a Bulkhead

As we were rebuilding the Navigation Station we noticed that there was a section of the bulkhead that had some dry rot in it.  I could push my finger against the veneered bulkhead and while the veneer in this section appeared solid, you could tell it was soft behind it.  After removing a little bit of the veneer we could actually push a finger into some sections of the plywood and it was soft.  (not so bad that it was just falling apart, but bad enough that I was really concerned).

I started to read about scarfing two pieces of wood together and then fiberglassing over them.  This seemed like a lot of work and would still be a "patch".  I considered removing the bulkhead and replacing it all together, however on this boat, the bulkhead is tabbed in under the subfloor, tabbed in along the hull as well as tabbed in on the roof.  This particular bulkhead goes up the port side, across the ceiling in a decorative rounded shape and down the starboard side.    I quickly deduced that this was beyond my expertise and would likely be upwards of $5K at a yard.    So I started to really do some reading on penetrating epoxy and it's use specifically on stringers on boats.  If this stuff was strong enough to form a new "foundation" in the form of stringers, it may really do wonders on this small section of the bulkhead.

So with instructions read, and the web researched, I picked up a bottle of Boat Life's Git-Rot at my local West Marine.  I did notice that there are other brands of penetrating epoxy and some are geared toward home repairs.  I am assuming that these are likely similar in concept but I stuck to the one made for marine applications in this case.  (I don't think it mattered, but don't know for sure).

The job started by refrigerating the whole package of Git-Rot because if you are not applying it in 50-70 degree weather the manufacture recommends cooling it overnight in the refrigerator.  I can assure you at the end of June in South Texas, even with the AC on in the boat, it was warmer than that.

We drilled a series of holes into the bulkhead at about a 20degree downward slope being careful not to drill all the way through the bulkhead.  This allowed the injection spots for the epoxy to go through all layers of the plywood where needed.  Once drilled the product was mixed and shaken for the very exact amount of time (60 seconds) and then slowly squirted into each hole.
I started at the bottom of the vertical area to be epoxied and would slowly fill until the epoxy started to come out of the hole.  I would then move to the next.  I did this through each hole (about 18 of them or so) and as soon as I was done with the 18, I would start over again.  The goal is to keep doing this until the wood won't absorb any more of the solution.
I did this with 3 squirt bottles (about 4 ounces each) on the first day.  I started to really see it penetrating the wood because as I would inject the epoxy in one hole, I would at times see it start to seep into the wood below or adjacent to it.  This was a great sign for me as it showed that it was really being absorbed into the wood like a sponge.

The next day, I came back and repeated the process and it took about another bottle and a half (about 4 ounces each).  At this time, no more was being absorbed into the wood.  After letting it dry overnight, I sanded the surface of the wood smooth where some of the epoxy had gotten on the surface of the wood.

The test was in the "knock"  Before I started I knocked on the bulkhead and when I got to the rotted section it went form a crisp knock sound to a thud.  After using Git-Rot, I could no longer stick my finger in the wood anywhere, there was no "give" on the veneer and the knock test sounded crisp all the way across the bulkhead even over the spots that previously responded with a thud.

I would call this process a success and was glad to have been done in a few days (between applying the product and then veneering over the surface where I drilled the holes) rather than attempting to tear out and replace that bulkhead.

As is the case, if we do a project and don't find information or some good step by step "how to" instructions, we have been recording the progress and then putting them together as a video in hopes that it helps others.  It should be known that I am not doing this because of any product sponsorship and I happened to Choose Boat Life's brand but there are others out there that would likely work the same way.  This is being posted in hopes that if you are attempting a project like this, you find it useful.  It also has the secondary benefit of helping my chronicle the work we are doing on our own boat.  Like most boats, it seems that with every repair, we find something else that we determine we should correct as well.

Wednesday, June 20, 2012

Galley Cabinetry assembly

The Galley is starting to really come together now and it is nice to see items going back into the boat, rather than out of it.

We put the new laminate surface on all the counter tops.  We chose a laminate rather than granite due to the weight and the desire to ensure we kept the practicality of having fiddle rails on the counters.  If we went with a granite or stone, we were not sure how we would have effectively mounted fiddle rails on the edges.

After the laminate was down, we installed a shelf under the galley sink that has an access panel from above for dry storage. 

We then veneered all of the lower cabinets in African mahogany.  This included the side of the cabinets (one facing the nav station in the walkthrough the other facing the salon, and all front drawer and cabinet panels.  The veneer was put in place using not only the Pressure Sensitive Adhesive that it came with but also the standard contact cement on both surfaces method (like a laminate).  All of the new veneer received a sanding with 240 grit sandpaper.  This will smooth out the surface, blend in the joints and have a smooth surface to put a finish on.


The rear wall of the galley was laminated in Teak rather than Mahogany.  We are trying to keep the bulkhead walls in teak and really like the way it looks   For this we removed the Electric Propane control switch, cleaned the mating surfaces of all dust using a towel dampened with denatured alchohal.  This allows for a fast drying time and allowed us to then coat both mating surfaces with contact cement.  The new wall was cut out of a single large piece to fit the unique shape of the rear galley wall. 

The teak panel is 1/8th inch thick and made installing a little bit of a challenge as you had to cut it with a saw to shape rather than a knife like the thin veneer.  (Tip:  When applying contact cement to an area this large, it was helpful to have 2 people, Deb applied it to the wall and I applied it to the back of the teak panel, this allowed us to install it when it just started to get tacky rather than dry.


A new GFCI outlet was installed at the first plug in the wire chain and mounted back into the face of the pantry. 

New wire was run to the ceiling where insulation (3/4” closed cell foam) panels were installed between the fiberglass and the new pine slat ceiling.  The installation of the ceiling always presents a unique situation in that the roof arches to some extent, additionally the sides are not square so it starts with a single pine slat run fore to aft on the center line of the boat.  It then works outward from that so that the angled cuts to align with the outer curve of the boat can be made.   We have 
decided to install all LED lighting in the boat and wanted to have that light being emitted from the ceiling for general lighting, and then add reading lights at locations that make sense.  To that end, we mapped out how we wanted to control the lights for the common central are of the boat (the Galley, Nav Station, Walkthrough and Salon).  We liked the idea of having control of those lights from a central location near the  companion way.  We decided on mounting 6 switches (3 on each side of the companionway) that each control specifc lighting.  For example the 2 most forward switches will control the led lighting on the salon ceiling lighting on the port and starboard respectively.  The center switch on each side turns on the general lighting across the galley and companionway.  The next switches back control either the lights down the walkthrough, and on the port side control lights to light up the galley including one that shines into the top loading fridge/freezer unit. 

We are pleased with the LED lighting we chose.  They have a brushed aluminum finish, are bright but still a bit warm (not that sterile white from some LED’s) and can swivel slightly to point in specific directions.   They do not each have their own switch on the base which is why we mounted the bank of switches.

When we were looking for LED lights we considered just getting the marine fixtures with LED’s in the, however we wanted a little bit more versatility and selection for our lighting choices.  After speaking to some marine LED vendors at boat shows, I learned that LED’s for marine use are not something special but are typically the same as the ones that you can buy on line that are not “marine” specific.  Armed with that information, we decided to look at all LED lighting options.  We settled on some LED lights from Ikea that came with an adapter that went from 110V AC to 12V dc.  Because the output of the device included with the lights was in the 2-4 amp range, we worried a bit about the potential higher voltage that would be going to the lights.  I have ben assured that the lights will only draw what they draw, regardless of how many amps the supply “can” provide.  That said, I suspect that I won’t see the same life expectancy out of these as someone might on a regulated 2amp output.  So in the end, if I lose 25% of the life expectancy of these, it will still provide some 7500 hours of use.   For the money saved and the selection, I am hoping that I made a good choice.  So far so good but it has only been a couple of months at this point.  We will keep some spares on board in the event we needed to replace these.  Because of that reason we made mounting and replacing them fairly easy if we need to.

After the veneering, sanding, ceiling, lighting, electrical, etc, the sanded molding was all wiped down with denatured alcohol and the dry fitted.  Because the new ceiling is a bit thicker than the old headliner, and because the rear galley bulkhead veneer is thicker than the original, we knew we would have to slightly modify (trim) some of the molding.  We made those minor adjustments and reinstalled all of the trim in the galley and along the new ceiling. 

At this point we still have to build a new fridge/freezer lid with the new counter laminate to match, need to have the compressor serviced (still can’t believe I dripped water on the control panel when taking the sink out), fasten the sink and install the new faucet in the galley.    The next step from there will be bungs in all screw holes and varnish as a last step.


Saturday, May 19, 2012

Galley Rebuild Continues


It has been a little while since we provided an update.  I have been traveling a lot for work and Deb and I have been doing some traveling for pleasure, the down side of all that is that it takes us away from the boat projects and they seem to take longer than we hoped.

Since the last post, we have finished dis-assembling the majority of the items in the Galley.  We removed the cupboards and storage.  This included the galley length cupboard behind the stove, the ceiling cabinet above the refrigeration, the pots and pans storage under the stove and the under the companionway food storage cabinet.  
We rebuilt the new stove cabinets and the new galley length cupboard.  For all of the interiors of those cabinets we laminated them with white laminate so they would be easy to clean and reflect light.  On the outside of the galley length cabinet we veneered it with Mahogany so it matches the rest of the wood in the boat when we are through.
We made some new countertops and laminated them in formica that looks like granite.  On the new counter where the sink goes, we have fabricated an under the counter shelf and added an access panel in the top of the counter.  This will be great can, food and wine storage.


We have laminated all of the existing counter pieces with the same granite looking laminate as the counter tops so that they would match.  This includes sides and under the stove. 

The stove step (area that the stove hangs from it's gimbals) also was fabricated using the old pieces as patterns.  

We have rebid and sealed all fixed ports in the walkthrough and the galley and confirmed that they don't leak.  We have also fabricated new mahogany panels to go along the hull and ensure that the boat has that nice wooden look inside.  (The old pieces that were up were just completely delaminated from leaking ports over the years)

There is not a lot of room to add insulation here so we are only adding a thin insulating layer with a moisture barrier to help prevent condensation on the hull from getting to the wood panels.  We have chosen to use the high quality underlayment for laminate flooring.  It is closed cell foam with good insulating properties for it's thickness and has a built in moisture barrier on one side because it is design to be laid on slab flooring.

In addition to the counter tops, we have started to install the pine slat ceiling as well.  This is looking really good and when the whole boat matches the rear stateroom, it will look phenomenal as well as provide additional insulation for keeping the boat cool or warm (we are adding 3/4" thick insulation between the cored cabin top and the pine ceiling below.  
Plank Ceiling started (With Switches going in as well)

While doing this, we have continued to upgrade the electrical wires as we go, replacing 12v wire with Marine Grade wiring.  We are going with all LED lighting in the boat for primary lighting and incandescent only as backup.  One of the things we did, was found small "puck lights" that are LED and can swivel to direct the light.  We found these at Ikea and they came with a 120V AC to 12V DC adapter.  We simply throw the adapter away and connect these to the boats 12volt system.  I have wired them in such a way that we can have a switch on for ambiance lighting and enough to see, and then turn another switch to really light up the galley including one that shines into the refrigerator and over the sink and stove.  Here is where we will lose our nautical chops a bit.  We decided to wire these into switches at the companionway so they are all easily in reach.  That means in the ceiling we have mounted a household style bank of switches to control all overhead lighting forward of the rear stateroom.


The re-assembly is going good.  We still have half the ceiling planks to install, put the mahogany veneer on the lower bulkheads in the galley and install all the molding and plug (bung) the screw holes.  From there it is Varnish, Varnish and more Varnish.

I am thinking I am going to leave the nav station in a state of incomplete for a bit longer.  I am going to be making a new instrument panel for the new Radio, AIS, VHF, GPS and Secondary Screen.   I have been having fantasies about all the cool things I want to do with the nav station including the "screen" I mentioned.  I think I am going to set it up so that is can connect to the TV, Laptop, DVD and cameras mounted in the engine room and somewhere up top so we can see what is going on even if down below.    See... Fantasies :)


Monday, March 19, 2012

Galley Rebuild (More than we anticipated)

The plan has always been to completely refit the boat from Stern to stem and we did start in the owners stateroom and completed that.  The next section was the walkthrough, nav station and galley.  Lets talk about the Galley.

We planned on re-veneering the wood in the Galley and replacing the formica on the countertop top.  As we started the project we realized that there is always something you find that makes you think "Better to do it now while we have this apart"  
That is what happened to us, as we removed the old counter laminate, we found that around the sink faucet connections, it had leaked over time and the plywood countertop was wet inside.  It was still fairly sturdy but it made sense to remove it and replace it while doing this work.
As we removed that, we found that the back corner of the cupboard was also wet and so was the lower ceiling.  What we found was that after 30+ years of on and off leaking ports, the wood just had soft spots.

So we gutted it.  We have taken most of the parts to our garage and used the old ones as templates to cut and fabricate all new walls, counters, etc.  
Galley after gutting

This was our first time using laminate so we started on what will be the inside of the cupboard.  It turns out that is not so hard.  The first pass had a few small bubbles in it, but we adjusted and the rest looked good.  We ended up putting white laminate on the lower ceiling, inside of the cupboard (bottom, back and sides).   We chose white for it's ability to reflect light in those areas.  For the front of the cupboard (Which was originally white laminate) we fabricated a new piece and finished it in Mahogany Veneer.  

We still have work to do in the Galley, we have to fabricate one small wall that I ended up destroying removing it.  We must re-route several plumbing lines.  We will need to remove the laminate in the stove cavity and replace it with a nice laminate that will match the countertops.  
We also decided to add a top loading dry storage area behind the sinks, so some additional modifications will need to be done to the countertop to create the opening, lid and storage area below.  

As we continue to think out loud, and having all of this torn up right now, we are also considering modifying the rear cupboard to fit the microwave (and remove it from the countertop).  We are also now considering adding LED lighting in the new dry storage area as well as the cupboards with an indicator light to let us know when it is on.  We have kept a flashlight in the galley because it is fairly dark in the back corners of the cupboard so this will be a great improvement.  

Deb is quite the contributor to these boat projects.  We work together on the weekends and some nights that I am in town.  With my work travel schedule lately, I haven't been home during most weeks and Deb has continued to sand and prep for whatever the upcoming weekend work is.  She has been ensuring that we have what we need so when Saturday comes we can start early and work all day.  
As we were routing thin pieces of laminate, She even acted as a "Router Table".  She Freaking Rocks !!!!

Thursday, March 15, 2012

Rebuilding the Fixed Ports

When doing our refit on Last Affair, we decided to rebuild the large glass fixed ports in the boat.  There is a story behind why, but for the purpose of this blog, lets just go with “we decided to”.
This blog and subsequent videos are not going to be about how to rebed the window and frame to the fiberglass hull, but rather once removed, how to actually remove the glass from the frame and rebuild that.

This started innocently enough, it was to take the ports home and clean them up (They had a bunch of residual silicone on them from years or caulking by the PO (Previous Owner).  Once home, I started thinking that I really didn’t know if they leaked from the bedding into the hull or between the glass and the aluminum frame.  One way I thought to check was to lay the port down on a flat surface glass side down.  On these ports, the frame is about an inch thick and the glass is on one edge almost making it like a 1” deep bowl when laid flat with the glass down.  So, I poured a quart or 2 of water into that little 1” bowl.
In about 20 minute almost all of the water had leaked out from between the glass and the frame.  The majority of that was from the spot where the rubber sealant that goes around the glass was sealed back together at the bottom of the port (the bottom, that doesn’t seem like good planning either come to think of it).

These windows are rectangular (about 9” tall and 23” long but they have angles on both the leading and trailing end of the window forming a parallelogram (?) with rounded corners.  The point is that there was not a replacement out there that you could just go find easily to fit this size and shape.
  
I removed the screws holding the upper and lower halves of the frames together and pulled them careful away from each other exposing the edges of the glass and the rubber spline that was around the glass and pushed into the slot on the aluminum frame to hold it in place.

This part turned out to be a challenge.  I have looked at many places on line and local custom glass shops and can’t find the same shape spline.  While searching for sources for the spline, I decided to clean up the frames.

I was able to get some supplies (from Home Depot) so you can likely get it from your local hardware store to refinish the aluminum frames.
I started with a wire wheel on a lathe (a drill would work, this was just easier for me).  I used the wire wheel to brush, scrape and scratch away all of the old silicone, and gunk that was in the grooves of the aluminum.  I also used the wire wheel on the facing side of the aluminum in the areas that had scratches.  The wire wheel actually sands down the surface and removed the scratches.

I then lightly sanded these with a sanding disc in the same drill/lathe.  I used 400 and then 600 grit to remove the scratches that the wire wheel left.  This got it fairly smooth and confirmed that there was not more silicone caulk left. 

After the sanding, I installed the first buffing wheel (I used a denim buffing wheel) with “Tripoli” that is the brown buffing stick.  You rub it on the buffing wheel and then buff the aluminum.  After that was complete they were really starting to look good.  I then put on a loose cotton buffing wheel and used the “White Diamond” that is the white buffing stick.  I rubbed some on the cotton pad and ran at high RPM’s (3000 or so) and brought the surface up to a nice shine.  These are not as shiny as stainless steel, but pretty darn close.

In this video, you can see the before and after, but also can see the construction of the window, and how the glass gets put into the frames.  Where the spline came together is where mine were leaking.


NOTE UPDATE:  I have read a few posts on the internet about being cautious in using a wire brush on aluminum window frames because small amounts of the steel from the bristles can lodge on the softer aluminum and while not seen by the naked eye, could cause issues with corrosion due to dissimilar metals in a salt water environment.  I will update this blog over time if there seems to be any negative results from this method described. 

Now that the frames are complete, lets get back to the assembly of the glass into them.  I tried for a week, Rubber Mallet, Clamps, Tie down straps, bench vise and even the lathe to try to compress the frame together.  Long story short, I was defeated.  I couldn’t get the frames all the way together (1/2” gap could not be closed).  I called a local glass glazier and brought the 2 ports (or parts as it were).  He was able to rebuild both of them for $175.  Money well spent because comparable sized ports were $700 each.


I did the same leak test mentioned above and all was good.  We took them back to the boat and rebedded them back into the fiberglass and tested for leaks.