Now that we have wrapped up the Navigation Station, Galley and Walkthrough, we had friends in town and did some nice sailing, now it is back to the next bit of work on the boat.
So yesterday it started, cushions removed, everything removed from the storage below the settee, cupboards emptied and the demolition begins.
 |
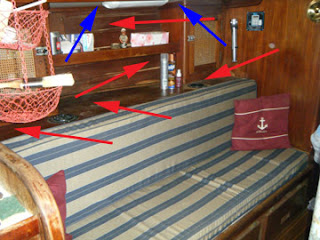
| Salon - Port Side - Before |
The leak actually appears to be coming from 2 places. One is from a poorly bedded opening hatch about 6 feet from that location. The other culprit appears to be the opening port just above the light itself.
The red arrows point to all of the areas where the wood will need to be replaced. This falls into 2 categories. The peeling veneer on the back wall is rather easy, typically it is just a thin 1/8" thick piece of veneered plywood as a decorative piece. The flat top of that counter behind the cushion is a little bit more complex and is 3/4 inch teak veneered plywood and helps to provide structure and strength to the boat by locking the galley and Vbert bulkheads together.
That is the countertop that the cupboards are mounted to, it is also the top of the storage area behind the seat back and houses the air conditioning vents for the Salon area.
 |
| Salon - Port Side - Wood removed |
We removed the cupboards, removed the decorative veneer wall from behind it. Removed the face of the storage area (Also the back of the salon seats) and then removed the horizontal piece that was rotting.
As we typically do, we have taken these wooden pieces to our storage unit where we will sand the moulding and all of the good pieces of wood down to fresh wood with 220 grit sandpaper. For the pieces that are rotted, we will use the old ones as patterns and make new ones.
The big decision now is if we will put it back the way it was, or try to improve upon the storage that the boat has, and we will likely need when living aboard. I think we will be doing the later and likely will make new cabinets that are deeper than the previous ones. We will also work to create dividers and doors across the entire countertop so that we have storage all the way across. By doing these 2 things, we should more than triple the amount of storage that was above the counter on the Port side of the boat.
The hole in the bottom of the seat is the access panel to the 16,500 BTU air conditioning unit that will be installed as soon as the leaking ports have been repaired.
The realization hit both of us today, it is amazing that in just 2 day of working (about 7 hours total) we have gutted this section of the boat again down to bare hull and fibreglass in areas. It will take us 3 months to build all the new stuff and install it again. And as we all know Murphy's law (I am convinced he was a sailor) kicked in and it started to rain today and will for the next 3 days when I really need to remove and rebed 2 opening ports and 2 opening hatches in the roof.
We did a small video showing what it looks like in more detail now that we have removed the old "stuff"